中文说明请参阅 README.zh-CN.md。
The AI Audio UI Biz Bundle enables ordinary Bluetooth headsets, glasses, speakers, and other audio products to be upgraded into AI products with AI note-taking and translation. It uses a professional recording algorithm with advanced language models for real-time transcription and translation in 100+ languages worldwide.
Before integrating this biz bundle, complete Preparation and Framework Integration.
Demo: tuya-aivoice-ios-sdk-sample-objc.
When you use Cursor, Claude Code, or similar agents to integrate the Tuya AI Audio UI biz bundle on iOS, load the companion skill aivoice-integration/SKILL.md (skill id: tuya-aivoice-ios-integration). It includes a decision tree, CocoaPods and config steps, SDK initialization, login, home and device flows, provisioning, and mini program routing aligned with this repo.
- Cursor: Add the skill under your user or project skills directory when working in this repo, or attach
aivoice-integration/SKILL.mdin integration-related chats. - Tip: Have the agent read that file first so guidance stays consistent with
MARK: AIVoicecomments and the sections below.
-
Important integration, configuration, and business-logic notes in the project are marked in source with
MARK: AIVoice.
When integrating, search the project forMARK: AIVoiceand read each comment to avoid misconfiguration or misuse. -
Ensure the project includes
ThingSmartCryption.xcframeworkandthing_custom_config.json.
{
    "config":
    {
        "appId":"",
        "thingAppKey":"",
        "appScheme":"AIVoiceDemo",
        "needBle":true,
        "is_support_home_manager":true,
        "need_backgroud_audio":true,
        "needQRCode": true,
        "device_detail_mini_program": true,
        "hotspotPrefixs": ["AAA", "BBB"],
        "support_ble_gpt": true,
    },
    "colors": {
        "themeColor": "#FFA228"
    },
    "blackColors": {
        "themeColor": "#FF5A28",
        "backgroundColor": "#000000",
        "warningColor": "#FF4444",
        "tipsColor": "#2DDA86",
        "guideColor": "#1989FA",
        "navigationBarColor": "#1A1A1A",
        "tabBarSelectedColor": "#FF5A28",
        "alertMaskAlpha": 0.7
    }
}
Parameter overview
| Parameter | Description | Type | Required | Default |
|---|---|---|---|---|
| appId | App ID from Tuya Developer Platform: open your app/SDK page; the id in the page URL is appId (e.g. https://platform.tuya.com/oem/app?id=888888 → appId is 888888) |
Number | Yes | — |
| thingAppKey | AppKey for the SDK in Tuya Developer Platform | String | Yes | — |
| appScheme | Channel identifier for the SDK in Tuya Developer Platform | String | Yes | — |
| hotspotPrefixs | Hotspot name prefix for device provisioning | Array | No | ["SmartLife"] |
| needBle | Whether to support BLE device provisioning | Boolean | No | true |
| themeColor | UI theme color | String | No | #FF5A28 |

The sections below summarize these points; refer to in-code comments for implementation details and links.
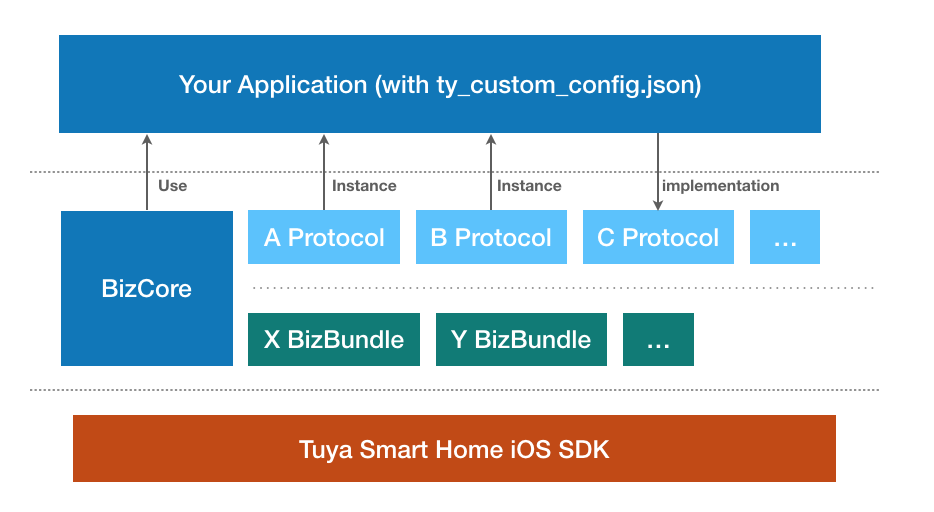
Tuya iOS biz bundles are exposed as services; all features are provided via protocols.
Before integrating the Tuya SDK, you should understand these concepts.
A home is the abstraction for a whole-home smart scenario: devices, accounts, and permissions for a single “home” or place.
Main capabilities: list homes, get devices/groups under a home, add/update/remove homes, rooms, and members.
| Class / Protocol | Description |
|---|---|
ThingSmartHomeManager |
List homes, sort homes, add home |
ThingSmartHome |
Single-home management (initialized with homeId) |
ThingSmartHomeDelegate |
Callbacks for home changes (devices, rooms, dps, etc.) |
You must initialize ThingSmartHome and call get home detail before homeModel, roomList, deviceList, groupList, etc. are populated. Then set the current home; the class that owns the home must conform to <ThingFamilyProtocol>.
// 1. Get home list (basic info only)
[self.homeManager getHomeListWithSuccess:^(NSArray<ThingSmartHomeModel *> *homes) {
    // If no homes, create one via addHomeWithName:geoName:rooms:latitude:longitude:success:failure:
} failure:^(NSError *error) { }];

// 2. Init current home and fetch detail (required before deviceList is available)
self.home = [ThingSmartHome homeWithHomeId:homeId];
[self.home getHomeDataWithSuccess:^(ThingSmartHomeModel *homeModel) {
    // Now self.home.deviceList / groupList / roomList etc. have data

    // 3. Set the current home
    [[ThingSmartBizCore sharedInstance] registerService:@protocol(ThingFamilyProtocol) withInstance:self];
    id<ThingFamilyProtocol> impl = [[ThingSmartBizCore sharedInstance] serviceOfProtocol:@protocol(ThingFamilyProtocol)];
    if ([impl respondsToSelector:@selector(updateCurrentFamilyId:)]) {
        [impl updateCurrentFamilyId:homeId];
    }
} failure:^(NSError *error) { }];- Docs: Home Management, Home Info
Devices are bound to a home after provisioning. Before device operations, ensure you have loaded home detail for that home (see above) so the device list and device instances are correct.
| Class | Description |
|---|---|
ThingSmartDevice |
Device control and management (rename, remove, publish DP, etc.) |
ThingSmartDeviceModel |
Device data (devId, name, dps, online status, etc.) |
// Device list comes from home after getHomeDataWithSuccess
NSArray *deviceList = [self.home.deviceList copy];

// Init device by devId (user must own device and home detail must be synced)
ThingSmartDevice *device = [ThingSmartDevice deviceWithDeviceId:devId];
device.delegate = self;  // Listen for dps updates, device info, removal, etc.

// Open device panel (mini program panel)
ThingSmartDevice *smartDevice = [ThingSmartDevice deviceWithDeviceId:device.devId];
id<ThingPanelProtocol> impl = [[ThingSmartBizCore sharedInstance] serviceOfProtocol:@protocol(ThingPanelProtocol)];
if (impl) {
    [impl gotoPanelViewControllerWithDevice:smartDevice.deviceModel group:nil initialProps:nil contextProps:nil completion:nil];
}- Docs: Device Management
Devices are home-scoped. All devices belong to a home. Before using device features (list devices, control devices, etc.), the user must have at least one home. If there is no home, create one, set the current home, and load home detail; only then can devices be listed and controlled.
- Where:
thing_custom_config.json&AppKey.h - What: Ensure AppKey, APPSecretKEY, and APPID from the Tuya IoT platform are set in these config files.
- Docs: SDK Preparation
- Where:
application:didFinishLaunchingWithOptions: - What: Initialize the Tuya SDK at app launch (e.g.
startWithAppKey:secretKey:). Configure keys, environment, and debug options per docs. - Docs: Integrate SDK
- What: Demo mini program entry URLs and AppIDs are defined as constants in
MiniAppRoutes.h(e.g. AI Notes, AI Translation recording, simultaneous interpretation, real-time transcription, dialogue translation). - Note: If you use different mini programs or paths, update the constants here to match Tuya platform configuration to avoid navigation failures.
- What: Examples for login, registration, verification code, and third-party login live in this service.
- Note: Choose the right auth flow for your app and handle token, user info, and logout correctly.
- Docs: User & Account
- What: Examples for Wi-Fi, Bluetooth, and other provisioning flows.
- Note: Different products may use different provisioning APIs; choose the right one and handle timeouts and errors.
- Docs: Device Provisioning
- What: To open the Tuya standard device panel when tapping a device in the list, use
gotoPanelViewControllerWithDevice. - Note: For a custom panel, add the
ThingSmartPanelBizBundleUI biz bundle in the Podfile. - Docs: Open Panel
- What: The Tuya SDK manages devices and permissions by home, so at least one home is required for device features.
- Note: You can create a default home on first launch or after registration (see Demo); for multiple homes, implement list and switch logic.
- Docs: Home Management
- What: After creating or selecting a home, set the current home (e.g. via
updateCurrentFamilyId) so the SDK loads device list and permissions for that home. - Note: With a single home, call update current home during home or device-list init to avoid an empty list or permission issues.